- Key takeaways
- Part 1. Understand where robot standby power goes
- Part 2. Measure standby current and estimate battery drain
- Part 3. Identify hidden standby power drains
- Part 4. 5 methods to reduce standby power
- Part 5. Balance energy savings with robot responsiveness
- Part 6. Verify improvements with before-and-after testing
- Part 7. Account for standby drain when selecting a robot battery
- Part 8. FAQs
Battery-powered robots do not stop consuming energy just because their motors stop moving. Navigation sensors, wireless modules, microcontrollers, and power-management circuits may continue drawing current while a robot waits for its next task. Over hours or days, this hidden consumption can reduce available battery capacity and shorten operating time.
According to the International Federation of Robotics (IFR), global shipments of professional service robots reached nearly 250,000 units in 2025, an increase of 24% year over year. These robots support applications such as transportation, logistics, healthcare, and other professional services. As more robots operate between scheduled tasks, standby energy consumption becomes an important part of overall power-system design.
Whether you are developing a robotic vacuum cleaner, an autonomous mobile robot (AMR), an educational robot, an inspection device, or a compact service robot, reducing standby power drain starts with understanding where the energy goes and which loads can safely be switched off.
Key takeaways
- Standby power can come from controllers, sensors, wireless modules, voltage regulators, and peripheral circuits.
- Measuring average standby current is more useful than relying on a single instantaneous reading.
- Firmware sleep modes, scheduled sensor operation, and selective peripheral shutdown can reduce unnecessary consumption.
- Lower standby current must be balanced against wake-up time, connectivity, and safety requirements.
- Battery sizing should account for both active operation and energy consumed while the robot is idle.
Part 1. Understand where robot standby power goes
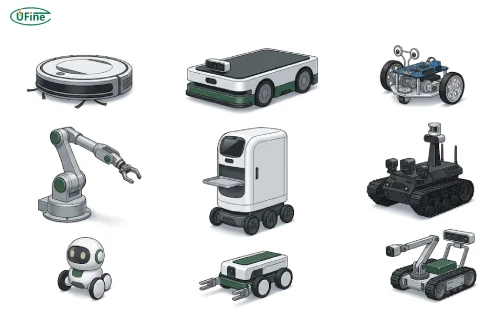
A robot can remain electrically active even when it is physically stationary. Its controller may continue processing data, a wireless module may maintain a network connection, and sensors may keep monitoring the surrounding environment.
The actual power demand depends on the robot’s design. A robotic vacuum cleaner waiting between cleaning cycles may use a different standby strategy from an AMR that must remain available for remote dispatch. An educational robot may need to preserve its program state, while a security robot may need to keep selected sensors and communication links active.
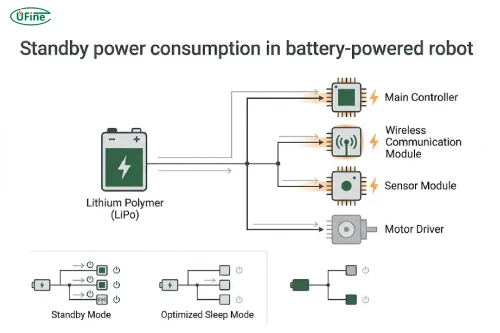
Common standby loads include:
- Main controller: The microcontroller or processor consumes energy while maintaining system state or executing background tasks.
- Sensors: Cameras, LiDAR, ultrasonic sensors, and other detection modules may remain powered even when continuous monitoring is unnecessary.
- Wireless communication: Wi-Fi, Bluetooth, and cellular modules consume power while connected, transmitting data, or searching for a network.
- Motor-control electronics: Motor drivers and associated circuits may draw current even when the motors are inactive.
- Power-management circuits: Voltage regulators, monitoring circuits, and battery protection electronics can continue consuming energy.
The key is to distinguish essential standby functions from loads that remain active simply because the hardware or firmware has not been configured for low-power operation.
Part 2. Measure standby current and estimate battery drain
Before changing hardware or firmware, establish how much power the robot consumes in its current standby state. Without a baseline, it is difficult to tell whether an optimization has made a meaningful difference.
Fully charge the battery, place the robot in its intended standby mode, and allow startup activity to settle. Then measure current using an appropriate power analyzer or current-measurement instrument. If the robot periodically wakes to check sensors or send network messages, monitor it long enough to capture those cycles. A single instantaneous reading may miss short current spikes or periodic background activity.
For a battery-powered robot, standby power can be calculated using this formula:
Formula 1: Standby power
P_standby = V_battery * I_standby
Where:
- P_standby = standby power in watts (W)
- V_battery = battery voltage in volts (V)
- I_standby = average standby current in amperes (A)
- * = multiplication
To estimate the energy consumed during an idle period, use the following formula:
Formula 2: Standby energy consumption
E_standby = P_standby * t
Where:
- E_standby = standby energy consumption in watt-hours (Wh)
- P_standby = standby power in watts (W)
- t = standby duration in hours (h)
The following example shows why even relatively small currents deserve attention.
Suppose a robot uses a 3.7 V, 2,000 mAh lithium polymer battery and draws an average standby current of 20 mA.
First, convert the current from milliamperes to amperes:
I_standby = 20 / 1000 = 0.020 A
Then calculate standby power:
P_standby = 3.7 * 0.020 = 0.074 W
Over 24 hours, the energy consumption is:
E_standby = 0.074 * 24 = 1.776 Wh
The battery has a nominal energy capacity of approximately 7.4 Wh. To estimate the theoretical idle duration, divide the battery capacity in ampere-hours by the standby current in amperes.
Formula 3: Theoretical standby duration
t_idle = C_usable / I_standby
Where:
- t_idle = theoretical idle duration in hours (h)
- C_usable = usable battery capacity in ampere-hours (Ah)
- I_standby = average standby current in amperes (A)
For this example, assuming the full nominal capacity is available:
C_battery = 2000 / 1000 = 2.0 Ah
t_idle = 2.0 / 0.020 = 100 hours
That is roughly 4.2 days under idealized conditions. Actual performance will be lower if the robot periodically wakes up, operates other components, encounters unfavorable temperatures, or reaches its low-voltage cutoff before all nominal capacity is available.
| Average standby current | Standby energy per day at 3.7 V | Theoretical idle duration with 2 Ah |
|---|---|---|
| 5 mA | 0.444 Wh | 400 hours |
| 10 mA | 0.888 Wh | 200 hours |
| 20 mA | 1.776 Wh | 100 hours |
| 50 mA | 4.440 Wh | 40 hours |
These are illustrative calculations assuming constant current and nominal battery voltage. Actual energy consumption should be measured because battery voltage changes during discharge and many robots have variable standby loads.
Part 3. Identify hidden standby power drains
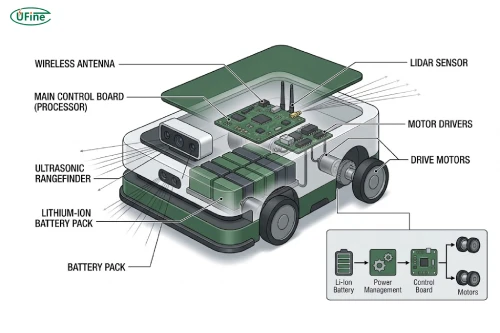
Once you know the total standby current, the next challenge is identifying its sources. A robot drawing more current than expected does not necessarily have a defective battery. The cause may be a peripheral that never enters sleep mode or a firmware task that repeatedly wakes the processor.
Wireless communication is one common source. A robot that maintains a Wi-Fi connection, frequently sends status updates, or repeatedly attempts to reconnect in a weak-signal environment may consume more energy than expected. Bluetooth advertising intervals and unnecessary network polling can also contribute to the total.
Sensors deserve similar attention. A camera or LiDAR module may be unnecessary during an extended waiting period, yet continue consuming power because the software leaves it running. Even low-power sensors can add up when several remain active simultaneously.
Power-conversion circuits are another potential source. Voltage regulators consume a small amount of current to operate their internal circuitry, even when their output load is minimal. This is known as quiescent current. A regulator with poor light-load efficiency can also waste energy when the robot is barely drawing power.
Finally, inspect firmware behavior. Frequent timer interrupts, continuous background polling, unnecessary data logging, and overly aggressive status checks can prevent the processor from entering its intended sleep state.
A practical way to isolate these loads is to measure standby current while disabling one subsystem at a time. Compare the results under otherwise identical conditions. This helps identify which changes will deliver the greatest savings.
Part 4. 5 methods to reduce standby power
1 Choose the right processor sleep mode
Many microcontrollers support several low-power states. An idle mode may stop some processing activity while keeping clocks and peripherals available. Deeper sleep modes can reduce consumption further, but may disable additional functions or require more time to restore normal operation.
The best choice depends on how quickly the robot must respond. A device that wakes every few seconds may benefit from a lighter sleep state, while a robot waiting for hours may justify deeper sleep.
Before implementing a mode, verify which timers, communication interfaces, memory contents, and wake-up sources remain available. A sleep mode that saves energy but prevents reliable recovery is not a successful optimization.
2 Schedule sensor operation
Not every sensor needs to run continuously. If a robot is waiting for its next task, it may be possible to power down a camera, reduce the sampling frequency of selected sensors, or use a low-power wake-up sensor to trigger more detailed monitoring.
For example, an educational robot may not need continuous camera processing while waiting for a user command. An inspection robot may be able to collect sensor readings at intervals instead of maintaining its full sensing system between inspection points.
The important limitation is that reduced sampling must still meet the application’s detection and response requirements.
3 Optimize wireless communication
Review how often the robot sends telemetry, checks for commands, and reconnects to a network. Where real-time communication is unnecessary, increasing reporting intervals or grouping data transmissions may reduce energy consumption.
However, a robot that must accept urgent commands cannot simply disconnect from its network without considering the consequences. Test the effects on connection recovery, command latency, and remote monitoring before changing communication settings.
4 Switch off unused peripherals
Selective power control allows the robot to keep essential circuits active while disconnecting nonessential loads. Load switches or suitable power-management circuits can be used to control power to sensors, displays, and other peripherals.
Pay attention to signal connections when switching off a module. A powered controller can sometimes supply current to an unpowered peripheral through its input/output pins, a phenomenon known as back-powering. This can undermine energy savings and potentially cause unreliable behavior.
5 Reduce losses in the power path
Choose voltage regulators suited to the robot’s operating range, especially at very light loads. Compare quiescent current, shutdown current, and light-load efficiency rather than evaluating regulators only at their maximum rated output.
Also review indicator LEDs, pull-up resistors, auxiliary circuits, and always-on monitoring components. Individually, these may seem insignificant, but their combined consumption can be substantial in a compact, battery-powered device.
Part 5. Balance energy savings with robot responsiveness
The lowest possible standby current is not always the best design target. A robot that takes too long to wake up, loses its network connection, or must repeat a lengthy sensor initialization sequence may perform poorly even if it consumes less energy.
Consider the robot’s typical idle pattern. During brief pauses between movements, keeping the processor in a light sleep state may be more efficient overall than repeatedly shutting down and restarting peripherals. During overnight inactivity, deeper sleep may be worthwhile. For long-term storage, a dedicated shutdown or storage mode may be more appropriate.
Safety also matters. Emergency response functions, fault monitoring, and other safety-critical systems must remain available whenever the application requires them. Power-saving changes should never disable essential protective functions simply to achieve a lower current reading.
Part 6. Verify improvements with before-and-after testing
After implementing changes, repeat the original measurement procedure. Use the same battery conditions, standby definition, communication environment, and measurement duration wherever possible.
Calculate the percentage reduction in average standby current using the following formula:
Formula 4: Standby current reduction
Reduction_percent = ((I_before – I_after) / I_before) * 100
Where:
- Reduction_percent = percentage reduction in standby current
- I_before = average standby current before optimization
- I_after = average standby current after optimization
For example, reducing standby current from 20 mA to 8 mA produces:
Reduction_percent = ((20 – 8) / 20) * 100= 60%
At 3.7 V, the theoretical daily standby energy consumption falls from 1.776 Wh to 0.7104 Wh.
But current reduction alone does not prove that the system has improved. Test wake-up reliability, sensor initialization, wireless reconnection, and recovery of the robot’s previous state. Repeat the tests under realistic operating conditions, including periods of intermittent activity.
Part 7. Account for standby drain when selecting a robot battery
Battery capacity should be based on the robot’s entire operating cycle, not just the energy consumed while its motors are running.
A useful starting point is:
Formula 5: Total energy consumption
E_total = E_active + E_standby
Where:
- E_total = total energy consumption over the selected operating period (Wh)
- E_active = energy consumed during active operation (Wh)
- E_standby = energy consumed during standby periods (Wh)
If a robot spends several hours waiting between missions, standby consumption may represent a meaningful portion of its daily energy budget. Estimating both active and idle energy helps determine the required battery capacity without unnecessarily increasing battery size and weight.
For compact robots, lithium polymer (LiPo) batteries can offer flexibility in dimensions and capacity, making them useful when the available enclosure space is limited. The battery must still meet the system’s voltage, current, protection, and operating-temperature requirements.
A custom battery pack can help accommodate the physical and electrical constraints of a robotic device. However, a larger battery alone will not solve excessive standby drain. The best results come from combining suitable battery selection with efficient electronics, thoughtful firmware, and measured power-management improvements.
Part 8. FAQs
1. Can a robot battery lose capacity if the robot remains idle for several weeks?
Yes. Even when a robot is switched off, the battery may experience self-discharge. Connected electronics, battery monitoring circuits, and protection boards can increase energy loss if they remain powered. For long-term storage, follow the battery manufacturer’s recommended storage voltage, temperature, and charging procedures.
2. Can a robot’s battery monitoring system consume significant standby power?
It can, particularly in designs where voltage monitoring, current sensing, communication, or periodic measurements remain active continuously. The actual impact depends on the circuit design and sampling frequency. Engineers should evaluate the combined consumption of the monitoring IC, voltage-divider resistors, and associated circuitry.
3. Why does a robot consume more power in standby when the wireless signal is weak?
Wireless modules may increase transmission effort, search for a network, or repeatedly attempt reconnection when signal quality is poor. These activities can increase average current consumption. Testing standby power under different signal conditions can help identify whether connectivity is contributing to unexpected battery drain.
4. Should a battery-powered robot be fully charged before long-term storage?
Not always. Many rechargeable lithium-ion and lithium polymer batteries are better stored at a partial state of charge rather than remaining fully charged for extended periods. The recommended storage charge level depends on the specific battery and manufacturer guidance. Disconnecting unnecessary loads and checking the battery periodically can also help prevent excessive discharge during storage.
5. Does ambient temperature affect robot standby battery drain?
Yes. Temperature affects battery self-discharge, available capacity, and the behavior of electronic components. Low temperatures can reduce the battery’s immediately available capacity, while high temperatures can accelerate battery aging and increase long-term degradation. Testing at the robot’s expected operating and storage temperatures provides a more realistic estimate of standby performance.
Related Tags:

More Articles

How to Select Battery Wire Gauge for High-Current Robot Applications
Not sure which wire gauge your robot needs? Compare AWG sizes, calculate current and voltage drop, and find a safer battery wiring solution.
How to Test Battery Overcurrent Protection in an Electronic Device
Want to verify battery safety? Learn how engineers test overcurrent protection, measure response time, and optimize LiPo battery performance.
AI Hardware’s Challenge: The Battery Problem
AI hardware is evolving fast, but power limitations could slow adoption. Learn how advanced lithium batteries solve the challenges of smarter devices.
How to Measure Standby Power Consumption in Battery-Powered Devices
Learn how to measure standby power, detect hidden current drain, and calculate battery life with practical testing methods for battery-powered devices.
How to Audit a Battery Manufacturer Before You Buy
Not sure if a battery supplier is reliable? Learn what to inspect, which records to request, and how to spot risks before placing an order.