- Key Takeaways
- Part 1. Tools & safety
- Part 2. Choosing the right multimeter settings
- Part 3. How to check voltage
- Part 4. Interpreting your voltage results
- Part 5. How to check internal resistance
- Part 6. Estimating capacity
- Part 7. How to tell if a battery cell is dead
- Part 8. Common pitfalls & mistakes
- Part 9. FAQs
Key Takeaways
- You can quickly check lithium battery health using a basic multimeter — but accuracy and safety matter.
- Voltage tells you state of charge; resistance and load behaviors tell you real‑world health.
- 3.7 V and 12 V batteries have different healthy voltage ranges that you must know.
- A multimeter won’t tell you exact capacity, but with a little extra technique you can estimate usable capacity.
- Always inspect the battery visually first and don’t skip safety basics.
Batteries don’t come with health indicators — and that’s where a multimeter becomes your best tool. Whether you’re working with small 3.7 V cells for flashlights or 12 V packs for scooters, testing batteries with a multimeter is essential to know whether they’re still good or getting weak. This guide will go step by step, show the proper settings, explain the results, and help you avoid common mistakes.
Part 1. Tools & safety
Before you start poking around with probes and voltages, let’s make sure you have the right gear and mindset.
What You’ll Need
- Digital Multimeter — A basic model with DC voltage, resistance (ohms), and ideally auto‑range. Auto‑ranging helps avoid range errors.
- Battery holder or connectors — Keeps battery stable and ensures good contact.
- Protective gear — Gloves and safety glasses are not optional — lithium batteries can spark or leak.
- Notebook & pen — This helps if you test periodically and want to track health over time.
Quick Visual Safety Check
Before touching anything with probes:
- Look for swelling or bulging.
- Check for cracks, tears, or leakage around the terminals.
- If you see any of these, the battery is compromised — stop testing and recycle/replace it, don’t push forward.
Part 2. Choosing the right multimeter settings
Getting the multimeter set up correctly makes your readings trustworthy.
DC vs AC
Always set your meter to DC Voltage (DCV) — batteries produce direct current, and measuring on AC will give you wrong readings.
Range Selection
- If your meter is auto‑range, great — it picks the correct range.
- If it’s manual, choose a voltage range slightly above your battery type:
- For 3.7 V cells: set 20 V range.
- For 12 V packs: same 20 V range works fine.
Pro tip: If you select too low a range, the reading may show “OL” or no stable number.
Probe Connections
- Black lead → COM (common)
- Red lead → VΩmA port (voltage/ohms input).
- Getting this right is crucial — if placed incorrectly, your reading can be zero even if the battery works.
Part 3. How to check voltage
This is the heart of battery testing. Voltage measurement tells you how charged your battery is right now.
Step‑by‑Step
- Disconnect the battery from any device or charger.
- Set your multimeter to DC Voltage.
- Place the red probe on the + terminal, black probe on the – terminal.
- Hold for a few seconds until the number stabilizes.
What the Numbers Mean
| Battery Type | Fully Charged | Good/Normal | Low | Needs Attention |
|---|---|---|---|---|
| 3.7 V Li‑ion | ~4.2 V | ~3.6–3.8 V | 3.0–3.3 V | <3.0 V |
| 12 V Li‑ion pack | ~12.6–13.6 V | ~12.8–13.0 V | ~12.0–12.4 V | <11.5 V |
These values give you quick insight into charge state — but remember, voltage alone doesn’t tell everything. A battery can show a normal voltage and still have low usable capacity.
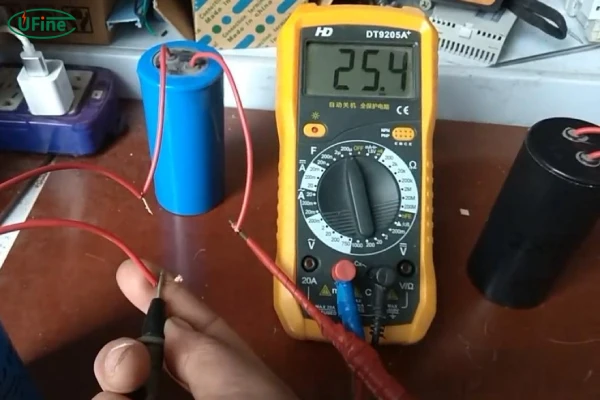
To see these battery testing steps in action, check out this short video demonstration below.
Part 4. Interpreting your voltage results
1 For 3.7 V Lithium Cells
- 4.1–4.2 V — Fully charged.
- 3.6–3.8 V — Healthy mid‑charge.
- 3.2–3.4 V — Lower charge, time to recharge soon.
- Below ~3.0 V — Over‑discharged and may be damaged.
- These ranges apply to typical cylindrical Li‑ion cells (like 18650s).
2 For 12 V Packs (Series Cells)
Large packs are essentially several cells in series (e.g., three 3.7 V cells ≈ 11.1 V nominal).
- 12.6–13.6 V — Fully charged.
- 12.8–13.0 V — Good operating voltage.
- 12.0–12.4 V — Lower state of charge.
- <11.5 V — Battery may struggle under load or have weak cells.
- This frames how to interpret a resting voltage vs what your device expects.
To better understand how your battery behaves under use, see our detailed explanation on how to read lithium battery discharge and charging curves
Part 5. How to check internal resistance
Internal resistance isn’t about whether the battery is charged, but how easily it can deliver current.
Why It Matters
Low internal resistance means the battery is still able to push current without significant voltage sag. High resistance often indicates aging or internal degradation.
How to Measure
- Switch the meter to ohms (Ω) mode.
- Connect probes red to +, black to –.
- Read the resistance. Lower is better.
This method is approximate — multimeters are not professional battery testers — but rising resistance over repeated tests is a red flag.
If you want to dive deeper into measuring a battery’s hidden weakness, check out our guide on how to measure lithium battery internal resistance
Part 6. Estimating capacity
Multimeters aren’t designed to directly measure capacity (mAh), but you can estimate it with a controlled load:
- Fully charge the battery.
- Connect a steady load (resistor or small device).
- In series with the load, connect the multimeter to measure current.
- Record how long it takes the voltage to drop to a cutoff level (e.g., ~3.0 V for a 3.7 V cell).
- Multiply current (A) × time (h) to estimate capacity (Ah).
This isn’t 100% accurate without professional equipment, but gives you real‑world insight into how long the battery can deliver current before it’s effectively drained.
Part 7. How to tell if a battery cell is dead
Sometimes, even after testing voltage or resistance, you still need to know if a battery cell is truly dead. Here’s how you can identify it:
1. Voltage Check
- A completely dead lithium cell will usually read below 2.5–3.0 V (for a 3.7 V cell).
- For a 12 V pack, if one cell reads significantly lower than the others in a series, that cell is likely dead.
2. Load Test
- Apply a small load (like a resistor or small device) and observe the voltage drop.
- If the voltage drops instantly to near zero, the cell cannot sustain current and is effectively dead.
3. Swelling or Physical Damage
- Check the battery casing.
- Swollen, leaking, or punctured cells are irreversibly damaged and should not be used.
4. Internal Resistance
- Measure resistance with your multimeter.
- Extremely high resistance (much higher than similar healthy cells) indicates the cell cannot deliver power — a clear sign it’s dead.
Quick Tip If one cell in a multi-cell pack is dead, it can drag down the whole pack’s performance. In most cases, it’s safer to replace the entire pack rather than just the single cell.
Part 8. Common pitfalls & mistakes
Here are some everyday mistakes users make:
- Testing under load or while connected to a circuit — this gives wrong readings.
- Wrong range selection on the multimeter — results can look random or “0”.
- Not stabilizing probes — shaky contact leads to fluctuating or misleading values.
- Relying on voltage only — voltage might look normal, but the battery still performs poorly.
When in doubt, repeat the test and compare to past logs if you have them.
Part 9. FAQs
1. Can a multimeter tell how much actual life (capacity) a battery has left?
Not directly. You can estimate capacity with a controlled load, but for precise capacity numbers you’d need a battery analyzer.
2. Can I test a battery inside the device?
Usually no. Inside circuits, load and other components can skew the readings. It’s best to test the battery alone.
3. What if the voltage is normal but the battery dies fast?
That usually means the internal capacity has dropped — the battery can still show respectable voltage, but can’t supply current for long.
4. Is measuring current directly dangerous?
Yes — measuring current incorrectly can short the battery. Always measure current in series with a load, not directly across the terminals.
5. What’s the difference between rechargeable Li‑ion and single‑use lithium battery readings?
Rechargeable Li‑ion can vary based on state of charge. Single‑use lithium cells (like CR123A) have a fixed nominal voltage and you use different expected values.
6. Why should I log my readings over time?
Patterns matter. A battery that slowly drops voltage sooner than expected is aging even if its current reading is fine. Logging helps spot trends.
Related Tags:

More Articles

Best 5 Riding Lawn Mower Battery Manufacturers
Looking for the best riding mower battery? Compare top battery brands by lifespan, maintenance, price, and performance.
All You Need to Know About CB Certification for Lithium Batteries
Learn what CB certification and the IECEE CB Scheme mean for lithium batteries. Explore requirements, testing, benefits, and global market access.
How to Choose the Right 3S LiPo Battery 5000mAh for Your RC Hobby Projects?
Learn how to choose the best 3S LiPo battery 5000mAh for RC cars, drones, boats, and planes. Compare C ratings, runtime, connectors, charging, and safety tips.
Comparing Semi Truck Batteries vs. Truck Batteries
Compare semi truck batteries and truck batteries by size, CCA, lifespan, and battery type. Learn how to choose the right truck battery for your vehicle.
Top 10 Flat Lithium Ion Battery Options for Compact Devices
Explore top flat lithium ion battery options, key specifications, and selection factors for compact electronics, medical devices, and energy storage systems.