- Part 1. Understand the structure of a 7.4V 18650 battery pack
- Part 2. Choose the right 18650 battery cells
- Part 3. Prepare the components and tools
- Part 4. How to build a 7.4V 18650 battery pack
- Part 5. Choose the right BMS, wires, and connectors
- Part 6. Test and check your 7.4V battery pack
- Part 7. Common mistakes to avoid when building a 7.4V battery pack
Among the many battery configurations available, the 7.4V 18650 battery pack is a popular choice for devices that require a balance of voltage, capacity, and reliable power delivery. Built using two lithium-ion cells connected in series, it offers a practical power solution for portable electronics, wireless equipment, and other battery-powered products.
But how do you build one? What components do you need, and how do series connections, parallel connections, and protection circuits work together?
Let’s explore the structure, components, configuration options, and key considerations involved in building a 7.4V 18650 battery pack.
Key Takeaways
-
A standard 7.4V 18650 battery pack uses two cells connected in series (2S).
-
Its nominal voltage is 7.4V, while its fully charged voltage is typically 8.4V.
-
Parallel connections increase capacity without changing the nominal voltage.
-
A suitable 2S Battery Management System (BMS) helps protect the battery pack.
-
Cell matching, insulation, wiring, and connector selection are essential for battery safety and performance.
-
Professional battery pack assembly is recommended for reliable results.
Part 1. Understand the structure of a 7.4V 18650 battery pack
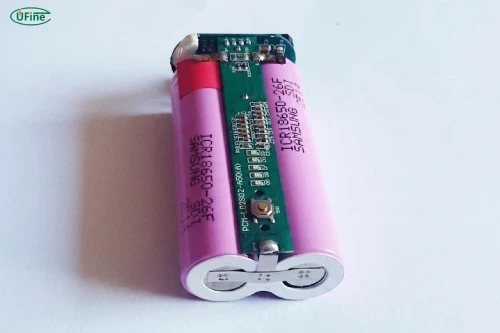
Before building a battery pack, you need to understand what its specifications actually mean.
The term 18650 refers to a cylindrical lithium-ion cell measuring approximately 18mm in diameter and 65mm in length. These cells are widely used because they offer a practical combination of energy capacity, compact dimensions, and established manufacturing technology.
A 7.4V 18650 battery pack typically consists of two cells connected in series, also known as a 2S configuration.
Each cell has a nominal voltage of approximately 3.7V. When two cells are connected in series, their voltages add together:
3.7V + 3.7V = 7.4V
However, 7.4V is the nominal voltage, not the maximum charging voltage. A typical lithium-ion 18650 cell reaches 4.2V when fully charged, meaning a fully charged 2S battery pack reaches 8.4V.
Understanding this difference is important when selecting a compatible charger and designing the device’s power system.
Understand series and parallel connections
Series and parallel connections determine the voltage and capacity of your battery pack.
Series connection (S)
Connecting cells in series increases the total voltage while keeping the capacity approximately the same as that of one cell.
For example, two 3.7V, 2500mAh cells connected in series create a 7.4V, 2500mAh battery pack.
Parallel connection (P)
Connecting cells in parallel increases total capacity while keeping the nominal voltage unchanged.
When designing a 7.4V battery pack, parallel groups can be added to provide more runtime and energy storage.
Here are some common configurations:
| Configuration | Number of cells | Nominal voltage | Capacity (2500mAh cells) |
|---|---|---|---|
| 2S1P | 2 | 7.4V | 2500mAh |
| 2S2P | 4 | 7.4V | 5000mAh |
| 2S3P | 6 | 7.4V | 7500mAh |
| 2S4P | 8 | 7.4V | 10000mAh |
For example, a 2S2P configuration uses four 18650 cells to provide twice the capacity of a 2S1P pack, assuming identical cells.
This configuration is useful when your device requires longer operating time without increasing its nominal operating voltage.
Part 2. Choose the right 18650 battery cells
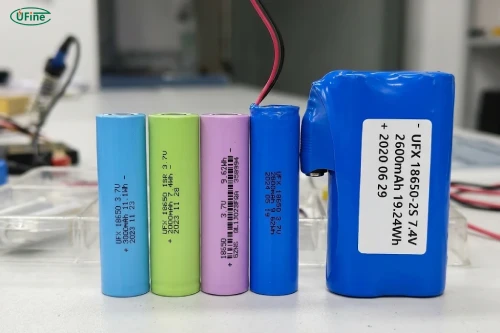
The performance of your finished battery pack depends heavily on the individual cells you select. Even if two cells have the same physical dimensions, their capacities, discharge capabilities, and internal resistance may be different.
Here are some important factors to consider.
Battery capacity
Capacity determines how much electrical energy a battery can store. Common 18650 cell capacities include 2000mAh, 2500mAh, 3000mAh, and 3500mAh.
Higher-capacity cells generally provide longer operating time, provided the discharge requirements are met.
Discharge rate
If your device requires high power, pay attention to the cell’s continuous discharge current rather than capacity alone. A high-capacity cell does not necessarily support a high discharge current.
Cell consistency
For a series-connected battery pack, both cells should have matching chemistry, capacity, voltage characteristics, and similar internal resistance. Using mismatched or aged cells can lead to uneven charging and discharging.
For a new battery pack, use compatible, new cells from a reputable manufacturer rather than mixing cells from different sources or conditions.
Part 3. Prepare the components and tools
Building a 7.4V 18650 battery pack involves more than simply connecting two cells. Each component has a specific function in ensuring electrical performance and mechanical protection.
| Component | Main function |
|---|---|
| 18650 lithium-ion cells | Store and supply electrical energy |
| 2S BMS | Provides battery protection and cell monitoring |
| Nickel strips | Create electrical connections between cells |
| Insulation materials | Reduce the risk of accidental short circuits |
| Battery enclosure | Protects cells from external impact |
| Wires | Transfer current to the connected device |
| Connectors | Provide a secure electrical interface |
You may also need professional spot-welding equipment and electrical testing instruments during the manufacturing process.
One important point: lithium-ion cells should not be treated like ordinary household batteries. Direct soldering to cell terminals, exposed metal connections, and incorrect welding procedures can create serious safety risks.
For this reason, battery pack assembly should be handled by trained personnel using appropriate equipment and controlled manufacturing procedures.
Part 4. How to build a 7.4V 18650 battery pack
Once you have selected the cells and determined the required configuration, the next step is battery pack assembly.
The following stages explain the overall manufacturing process. They are intended as a design overview rather than a DIY wiring procedure.
Step 1. Confirm the battery specifications
Start by defining your application requirements.
Determine the nominal voltage, required capacity, maximum continuous discharge current, available installation space, and expected operating time.
These specifications will influence the number of cells, configuration, BMS selection, and enclosure design.
Step 2. Select and inspect the battery cells
Choose compatible 18650 cells from a reliable manufacturer.
Each cell should be inspected and tested for voltage, capacity, internal resistance, and physical condition before assembly. Damaged, swollen, or abnormal cells must not be used.
Step 3. Determine the 2S configuration
Arrange the cells according to the required configuration, such as 2S1P or 2S2P.
The series arrangement establishes the 7.4V nominal output, while additional parallel cells increase capacity.
Step 4. Connect the battery cells
In professional production, suitable nickel strips and controlled spot-welding processes are commonly used to create cell interconnections.
The connection design must account for current requirements, contact resistance, mechanical stability, and heat generation.
Avoid improvised connections or direct soldering to bare cell terminals.
Step 5. Integrate the 2S BMS
A compatible 2S BMS is incorporated to monitor the battery groups and provide appropriate protection.
Its connections, current rating, voltage limits, and balancing functions must match the cell specifications and intended application.
Step 6. Add insulation and mechanical protection
After electrical assembly, appropriate insulation and protective materials are installed.
The finished battery pack should prevent accidental contact between conductive components and protect cells from vibration, impact, and mechanical damage.
Step 7. Install the output wires and connector
Finally, the battery pack is fitted with suitable output wires and connectors.
Their current ratings, wire gauge, polarity, and physical dimensions should match the device’s requirements.
Part 5. Choose the right BMS, wires, and connectors
Even when the cells are correctly selected, an unsuitable protection circuit or poorly matched electrical connections can affect the entire battery pack.
Choosing a 2S BMS
A 2S BMS should be designed for the specific lithium-ion cell chemistry and pack configuration.
Depending on its design, it may provide:
-
Overcharge protection
-
Over-discharge protection
-
Overcurrent protection
-
Short-circuit protection
-
Temperature monitoring
-
Cell voltage balancing
Not every BMS includes all these functions. Check the actual specifications before selecting one.
Also, its continuous discharge current rating should accommodate the device’s maximum operating current, including relevant peak loads.
Selecting wires and connectors
Wire selection depends on current, cable length, insulation temperature rating, and acceptable voltage drop.
Connectors also need to match the application’s current requirements and physical design.
Common options include JST, Molex, XT30, and XT60 connectors. These are not interchangeable simply because they can be connected to similar-looking wires.
Always verify connector polarity, pin configuration, and current rating before integration.
Part 6. Test and check your 7.4V battery pack
A battery pack should never be considered ready simply because its output voltage appears correct.
Professional quality control should include several checks.
First, measure the total pack voltage and verify that both series-connected cell groups operate within their specified voltage ranges.
Next, check the BMS protection functions, charging behavior, and discharge performance using appropriate test equipment.
It is also important to evaluate temperature during operation. Unexpected heating may indicate excessive current, high connection resistance, poor thermal design, or other electrical problems.
Finally, inspect insulation, wiring, connector stability, and enclosure integrity.
For portable electronic products, battery testing and compliance requirements should be considered at both the cell and finished-pack levels. The IEC 62133-2 standard provides safety requirements and testing criteria for portable rechargeable lithium-ion cells and batteries.
Part 7. Common mistakes to avoid when building a 7.4V battery pack
Several common design mistakes can affect battery performance and reliability.
Mixing incompatible cells: Combining cells with different capacities, ages, or electrical characteristics can cause uneven operation and reduce pack reliability.
Choosing the wrong BMS: A protection board with an unsuitable current rating or voltage configuration may not adequately protect the battery.
Ignoring insulation: Exposed conductive parts can create short-circuit risks, especially when the pack is installed in a compact enclosure.
Using unsuitable wires and connectors: Undersized wires and incompatible connectors can increase resistance, generate heat, and cause unstable power delivery.
Overlooking thermal management: Battery packs need an appropriate thermal design, particularly when used in devices with high power consumption or limited internal space.
A reliable battery pack requires all these elements to work together. Correct cell selection alone is not enough.
Related Tags:

More Articles
3.7V LiPo Battery Pack vs. 3.7V Lithium-Ion Battery Pack: What’s the Difference?
Choosing a 3.7V battery pack? Compare LiPo and lithium-ion batteries, and learn how to select the right capacity, charger, protection, and connectors.
3 Cell Laptop Battery Life: What You Need to Know
How long does a 3 cell laptop battery last? Compare battery life, replacement prices, compatible models, and practical tips before buying a new one.
18650 3S2P Battery Pack: Wiring, Parts & Safety Tips
Learn how to build an 18650 3S2P battery pack, choose the right cells, BMS, connectors, and wires, and avoid common assembly mistakes.
Solar Battery Bank: How Many Batteries Are Enough?
Find out how many batteries your solar system needs. Learn how to calculate battery capacity, compare battery types, and avoid costly sizing mistakes.
Swollen Laptop Battery? Don’t Ignore These Signs
Is your laptop case bulging? Find out why lithium batteries swell, what risks you should know, and how to handle a swollen battery safely.