- Part 1. Plan your battery pack before you start
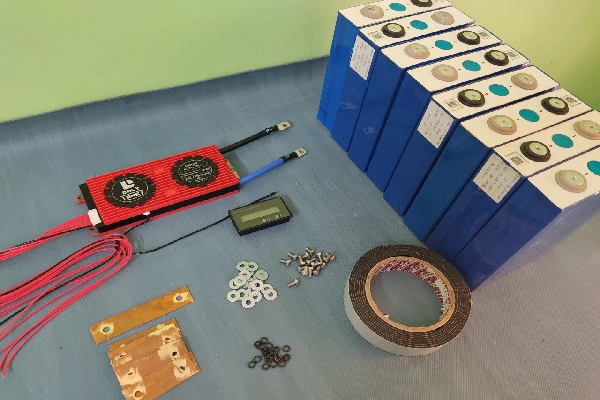
- Part 2. Materials and tools you need
- Part 3. Understanding series and parallel connections
- Part 4. How to choose the right LiFePO4 cells
- Part 5. How to choose the right BMS
- Part 6. How to build a LiFePO4 battery pack step by step
- Part 7. Choosing the right busbars, cables, and enclosure
- Part 8. Testing and commissioning your DIY battery
- Part 9. Common DIY LiFePO4 battery mistakes to avoid
- Part 10. DIY LiFePO4 battery troubleshooting guide
- Part 11. How much does it cost to build a DIY LiFePO4 battery
- Part 12. FAQs
If you have ever wondered how to build a LiFePO4 battery pack, how to assemble a LiFePO4 battery, or even how to make a LiFePO4 battery pack from scratch, this guide will walk you through the entire process. From planning and selecting components to wiring, BMS installation, testing, and troubleshooting, you will learn the essential steps to build a dependable DIY LiFePO4 battery.
Key Takeaways
- A successful DIY LiFePO4 battery starts with careful planning and correct component selection.
- You should calculate your required voltage, capacity, and energy consumption before buying cells.
- Always use matched LiFePO4 cells and a compatible Battery Management System (BMS).
- Proper cell balancing, insulation, and cable sizing improve safety and extend battery life.
- Thorough testing and commissioning are critical before putting your battery pack into service.
- For large battery banks or commercial applications, a professionally assembled battery pack may provide better long-term reliability.
Part 1. Plan your battery pack before you start
The biggest mistake beginners make is purchasing components before calculating their actual power requirements. A little planning can save money and prevent costly design errors.
1 Determine the required voltage
The battery voltage depends on your application. Common LiFePO4 battery configurations include:
- 4S (12.8V nominal) for RVs and small solar systems.
- 8S (25.6V nominal) for electric scooters and industrial equipment.
- 16S (51.2V nominal) for home energy storage and larger battery banks.
2 Calculate the required capacity
Battery capacity is measured in amp-hours (Ah), while total stored energy is measured in watt-hours (Wh).
Energy (Wh) = Voltage (V) × Capacity (Ah)
For example, if your equipment consumes 100W and needs to run for 10 hours, the required energy is approximately 1000Wh.
A 12.8V 100Ah LiFePO4 battery pack provides:
12.8V × 100Ah = 1280Wh
This gives you a useful safety margin above the required energy demand.
3 Consider your application
Before you build a LiFePO4 battery pack, think about where it will be used:
- Is it a fixed solar battery bank?
- Will it be installed in an RV?
- Does it need to withstand vibration in a robot or boat?
- Does weight or size matter?
Answering these questions early will help determine the best cell type and enclosure design.
Part 2. Materials and tools you need
Building a DIY LiFePO4 battery requires several essential components and basic electrical tools.
Main components
- LiFePO4 battery cells.
- Battery Management System (BMS).
- Copper busbars or nickel strips.
- Battery enclosure or case.
- Battery cables and connectors.
- Fish paper and insulation materials.
- Heat shrink tubing.
Essential tools
- Digital multimeter.
- Spot welder (for cylindrical cells).
- Torque screwdriver or wrench.
- Wire crimping tool.
- Heat gun.
- Safety gloves and eye protection.
DIY LiFePO4 battery pack component checklist
| Component | Purpose |
|---|---|
| LiFePO4 Cells | Store electrical energy |
| Battery Management System (BMS) | Protects the battery from overcharge, over-discharge, and overcurrent while balancing the cells |
| Copper Busbars or Nickel Strips | Connect individual cells together |
| Battery Cables | Carry charging and discharge current safely |
| Battery Enclosure | Provides mechanical protection and keeps components organized |
| Digital Multimeter | Measures cell and pack voltage during assembly and testing |
| Insulation Materials | Prevent short circuits and improve safety |
Part 3. Understanding series and parallel connections
Before you assemble a LiFePO4 battery, you need to understand how cells are connected.
A series connection (S) increases voltage, while a parallel connection (P) increases capacity.
For example:
- Four 3.2V cells connected in series (4S) create a 12.8V battery.
- Two identical 4S packs connected in parallel (2P) double the capacity while keeping the voltage the same.
Common LiFePO4 battery pack configurations
| Configuration | Nominal Voltage | Example Capacity | Typical Application |
|---|---|---|---|
| 4S1P | 12.8V | 100Ah | RVs, marine systems, portable power stations |
| 4S2P | 12.8V | 200Ah | Small solar battery banks |
| 8S1P | 25.6V | 100Ah | Electric scooters, industrial equipment |
| 16S1P | 51.2V | 100Ah | Home energy storage and off-grid solar systems |
Understanding the difference between series and parallel wiring is one of the most important parts of learning how to make a LiFePO4 battery pack.
If you’re still unsure about battery wiring, check out our guide to batteries in series vs parallel for a more detailed explanation.
Part 4. How to choose the right LiFePO4 cells
The quality of your battery pack depends heavily on the quality of the cells you use.
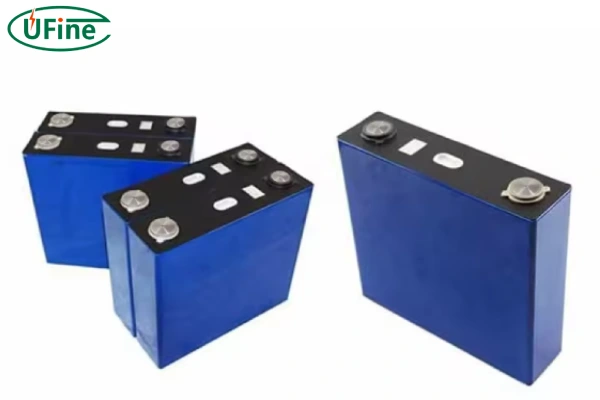
1 Prismatic vs cylindrical cells
Prismatic LiFePO4 cells are the most common choice for DIY battery projects because they are easy to assemble and provide high capacity. Cylindrical LiFePO4 cells are more compact but usually require spot welding.
2 Use matched cells
For the best results, always purchase cells from the same production batch. Mixing different brands, capacities, or ages can reduce performance and shorten battery life.
Try to keep the following differences as small as possible:
- Voltage difference: ≤ 0.03V.
- Capacity difference: ≤ 3%.
- Internal resistance difference: ≤ 5%.
Proper cell matching is one of the reasons professionally assembled LiFePO4 battery packs often outperform poorly designed DIY builds.
Proper balancing is essential for battery longevity, so you may also want to learn more about cell balancing before assembly.
Part 5. How to choose the right BMS
A Battery Management System (BMS) is the safety center of your battery pack. It monitors the condition of every cell and disconnects the battery if unsafe conditions occur.
A good BMS should provide:
- Overcharge protection.
- Over-discharge protection.
- Overcurrent protection.
- Short-circuit protection.
- Temperature protection.
- Cell balancing.
When choosing a BMS, make sure it matches your battery configuration. A 4S battery requires a 4S BMS, while a 16S battery requires a 16S BMS.
You should also select a BMS with a continuous current rating at least 20% higher than your expected maximum load. If your system normally draws 80A, choosing a 100A BMS is a sensible design choice.
Some advanced BMS models also include Bluetooth monitoring, CAN bus communication, or RS485 interfaces for energy storage systems.
Part 6. How to build a LiFePO4 battery pack step by step
Now that you have selected your components, it is time to begin the actual assembly process.
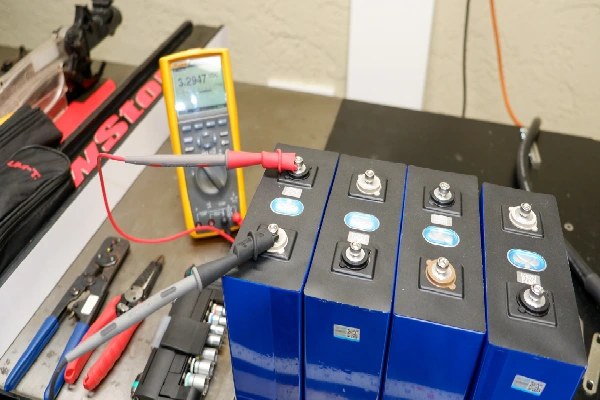
Step 1: Inspect and test all cells
Measure the voltage of every cell with a multimeter. Look for physical damage, swelling, or abnormal readings.
Record the voltage of each cell before assembly.
Step 2: Top-balance the cells
Top balancing ensures that all cells reach full charge at the same voltage. This process helps improve long-term pack stability and allows the BMS to operate more effectively.
Many experienced builders consider top balancing essential before assembling a DIY LiFePO4 battery.
Step 3: Arrange the cells
Lay out the cells according to your planned series and parallel configuration. Double-check polarity before making any electrical connections.
A simple mistake at this stage can damage the cells or the BMS.
Step 4: Connect the cells
Use copper busbars for prismatic cells or nickel strips for cylindrical cells. Tighten all terminal bolts according to the manufacturer’s recommended torque specification.
Avoid overtightening, which may damage the terminals.
Step 5: Install the BMS
Connect the BMS balance wires in the correct sequence specified by the manufacturer. Then connect the main negative and positive terminals.
Take your time with this step. Incorrect BMS wiring is one of the most common DIY assembly errors.
Step 6: Connect the battery cables
Select battery cables based on the maximum current your pack will deliver. Undersized cables create resistance, heat, and unnecessary energy loss.
Use quality crimped connectors and ensure every connection is secure.
Step 7: Add insulation and secure the pack
Use fish paper, insulating pads, and heat shrink tubing to prevent accidental short circuits.
For prismatic cells, many builders also use compression plates to minimize cell expansion during long-term cycling.
Step 8: Install the battery inside the enclosure
Choose a sturdy enclosure that protects the battery from moisture, dust, and vibration. Make sure there is enough space for wiring and airflow.
Step 9: Perform the initial charging process
Charge the battery slowly using a LiFePO4-compatible charger. Monitor individual cell voltages and ensure the BMS functions correctly.
Step 10: Test the completed battery pack
Measure the total pack voltage and verify that all cell voltages remain balanced. Perform a controlled discharge test to confirm the battery delivers the expected capacity.
Part 7. Choosing the right busbars, cables, and enclosure
Many DIY guides focus only on cells and BMS, but the supporting hardware is equally important.
Busbars
Copper busbars provide lower resistance than nickel strips and are the preferred option for high-current battery packs.
Battery cables
Choose cable size according to your maximum expected current. Using cables that are too small can lead to excessive heat generation and voltage drop.
Battery enclosure
A good enclosure should:
- Protect against vibration and impact.
- Keep moisture and dust away from the cells.
- Allow easy access for inspection and maintenance.
- Provide adequate support for the cell assembly.
For mobile applications such as RVs or robots, vibration resistance is especially important.
Not sure which terminals or connectors to use? Our battery and cable connectors guide covers the basics.
Part 8. Testing and commissioning your DIY battery
Before using your battery in real-world applications, perform a complete inspection and testing process.
Use the following checklist:
- All cell voltages are balanced.
- The BMS powers on correctly.
- No loose bolts or exposed conductors.
- Full charging cycle completed successfully.
- Controlled discharge test completed.
- Measured capacity is close to the design target.
It is a good practice to perform one or two complete charge-discharge cycles before placing the battery into regular service.
Part 9. Common DIY LiFePO4 battery mistakes to avoid
Even experienced builders can make mistakes during assembly. The following issues are among the most common:
Mixing unmatched cells
Never combine cells with significantly different capacities or voltages.
Skipping cell balancing
Failing to balance cells before assembly may reduce pack performance and increase stress on the BMS.
Choosing the wrong BMS
An undersized BMS may trip frequently or overheat during operation.
Using undersized cables
Poor cable selection increases resistance and may create dangerous hot spots.
Inadequate insulation
Loose metal tools or exposed terminals can easily create short circuits during assembly.
Using the wrong charger
Always use a charger designed specifically for LiFePO4 chemistry.
Part 10. DIY LiFePO4 battery troubleshooting guide
If your battery does not work as expected, do not panic. Most problems can be traced to a few common causes.
Battery will not charge
- Check BMS connections.
- Verify charger compatibility.
- Measure individual cell voltages.
BMS disconnects unexpectedly
- The discharge current may exceed the BMS rating.
- Check for loose wiring connections.
Battery capacity is lower than expected
- Cells may not be fully balanced.
- One weak cell could be limiting overall performance.
Battery becomes warm during operation
- Inspect cable size.
- Check terminal torque.
- Verify that the current draw is within the design limit.
Part 11. How much does it cost to build a DIY LiFePO4 battery
One reason many people choose a DIY battery LiFePO4 project is cost savings.
A typical 12V 100Ah build may include:
- Four 3.2V 100Ah LiFePO4 cells.
- One 4S 100A BMS.
- Copper busbars.
- Battery enclosure.
- Cables and accessories.
Depending on component quality and shipping costs, the total cost is often significantly lower than a premium pre-built battery pack with similar specifications.
However, remember that your own time, tools, and assembly experience also have value. A lower purchase price does not always mean a lower total project cost.
Part 12. FAQs
1. What tools do you need to build a LiFePO4 battery pack?
The basic tools include a digital multimeter, torque wrench or screwdriver, wire crimper, heat gun, and insulated hand tools. If you are using cylindrical LiFePO4 cells, you may also need a spot welder.
2. Should you top-balance or bottom-balance LiFePO4 cells?
Most DIY builders prefer top balancing because it helps all cells reach full charge at the same voltage, allowing the BMS to maintain better long-term balance during normal operation.
3. What wire size should you use for a DIY LiFePO4 battery?
The correct wire size depends on the maximum current draw. Higher-current battery packs require thicker cables to minimize voltage drop and prevent overheating. Always choose cables rated for your application’s expected load.
4. Can you build a LiFePO4 battery pack without a BMS?
Technically, it is possible, but it is not recommended. A BMS protects the battery from overcharging, over-discharging, overcurrent, and cell imbalance, significantly improving safety and battery life.
5. How do you know if your LiFePO4 cells are matched?
Matched cells should have very similar voltage, capacity, and internal resistance values. The best practice is to use Grade A cells from the same production batch and verify their specifications before assembly.
6. How long does it take to build a DIY LiFePO4 battery pack?
For a first-time builder, a simple 12V LiFePO4 battery pack may take several hours to assemble and test. More complex battery bank projects with larger capacities can take a full day or longer.
Related Tags:

More Articles

How Many Volts Is a AAA Battery? Full Guide + Chart
Learn AAA battery voltage, normal range, full charge level, and dead voltage with a clear chart explaining different battery types.
The Ultimate Guide to 18650 Battery Holders
Discover 18650 battery holders: types, series vs parallel, applications, safety tips, and how to choose the right holder for electronics and DIY projects.
Overview of 3.7 V 18650 Battery
Understand the real meaning of 3.7V, voltage range, and safety risks of 18650 lithium-ion batteries before choosing one.
D Battery vs. C Battery: A Comprehensive Comparison for Modern Applications
Compare D battery vs C battery size, capacity, runtime, and applications. Learn the key differences and choose the right battery for your device.
What Does BMS Mean? (Battery Management System)
Discover what a BMS is, its main components, key functions, applications, and why it’s essential for lithium battery safety.