- Part 1. When should you replace a robot vacuum battery?
- Part 2. What type of battery does your robot vacuum use?
- Part 3. Does this guide work for all robot vacuum brands?
- Part 4. What you need before replacing the battery
- Part 5. Step-by-step robot vacuum battery replacement
- Part 6. What to do after installing the new battery
- Part 7. Common mistakes to avoid
- Part 8. Troubleshooting after battery replacement
- Part 9. Battery care, storage, and safety tips
- Part 10. Cost, replacement frequency, and is worth it?
- Part 11. Conclusion
- Part 12. FAQs
Robot vacuum cleaners are built to make life easier—but like any rechargeable device, their batteries don’t last forever. If your robot vacuum is running for shorter periods, stopping mid-clean, or refusing to return to its charging dock, the battery is usually the culprit.
The good news? Replacing a robot vacuum battery is much simpler than most people expect. You don’t need special tools or technical expertise—just the right battery and a few careful steps. This guide will walk you through when to replace the battery, what to prepare, and how to do it safely, step by step.
Most robot vacuum batteries last 2–4 years under normal home use.
If your robot still navigates correctly, docks properly, and cleans well—but just doesn’t run as long as it used to—battery replacement is usually the fastest and most cost-effective fix, often restoring performance close to new.
Part 1. When should you replace a robot vacuum battery?
Most robot vacuum batteries are designed to last 2–4 years, depending on usage and battery chemistry. Over time, performance naturally declines.
Common signs your battery needs replacement:
- Cleaning time has dropped significantly
- The robot shuts down before finishing a cycle
- It struggles to return to the charging dock
- The battery won’t charge to 100%
- Error messages related to power or charging
Keep in mind: occasional short runtime can be caused by dirty filters, clogged brushes, or high-power cleaning modes. But if these issues persist after basic maintenance, battery aging is likely the real reason.
For a broader look at robot vacuum power requirements, battery types, and lifespan comparisons, this vacuum cleaner battery guide explains the fundamentals in detail.
Vacuum Cleaner Battery Guide: Power, Types & Lifespan
Part 2. What type of battery does your robot vacuum use?
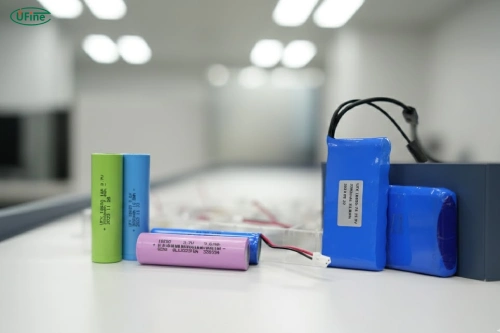
Most modern robot vacuums use Lithium-ion (Li-ion) batteries, while older or budget models may still rely on Nickel-Metal Hydride (NiMH) batteries.
How to check your battery type:
- Look at the label on the battery itself
- Check the user manual
- Visit the manufacturer’s official website
⚠️ Important: Do not blindly upgrade voltage or capacity. Even a small voltage mismatch can damage the control board or charging system.
Not sure whether to choose a NiMH or Li-ion replacement battery? This side-by-side comparison breaks down the key differences that actually matter in daily use.
NiMH vs. Li-ion: 15 Essential Facts Compared
Part 3. Does this guide work for all robot vacuum brands?
Yes—the battery replacement process is very similar across most brands, including iRobot, Roborock, Ecovacs, Xiaomi, and Shark.
However, there can be small differences:
- Some models hide screws under rubber plugs
- A few brands require battery calibration via the app
- Connector shapes may vary slightly
If your robot has an app, it’s a good idea to check whether it recommends a calibration cycle after battery replacement.
Part 4. What you need before replacing the battery
Battery replacement is straightforward, but preparation matters.
Tools:
- Small Phillips screwdriver (usually the only tool needed)
Safety checklist:
- Turn off the robot vacuum completely
- Remove it from the charging dock
- Work on a clean, flat surface
OEM vs Third-Party Batteries:
- OEM batteries: Guaranteed compatibility, higher price
- Third-party batteries: More affordable, quality varies
When choosing a third-party battery, make sure it matches:
- Voltage
- Capacity (mAh)
- Connector type
- Physical size
Part 5. Step-by-step robot vacuum battery replacement
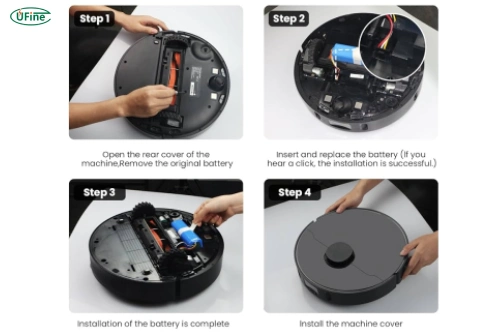
Simplified Battery Replacement Steps
Power Off the Robot
Turn off the robot vacuum and unplug the charging dock for safety.
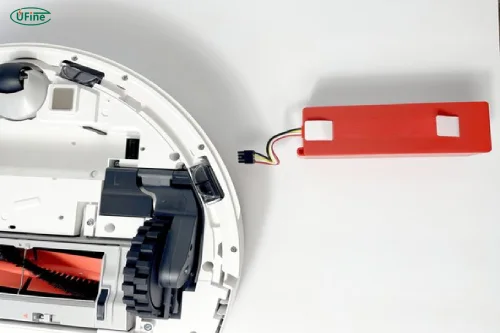
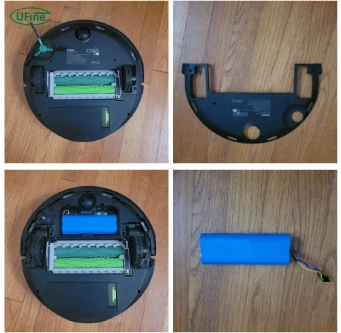
Flip the Robot Over
Place the robot upside down on a soft surface to avoid scratches.
Remove the Battery Cover
Use a screwdriver to remove the screws holding the battery compartment cover.
Disconnect the Battery
Gently unplug the battery connector—never pull on the wires.
Remove the Old Battery
Lift the old battery out carefully.
Insert the New Battery
Place the new battery into the compartment, ensuring proper orientation.
Reconnect the Battery Cable
Firmly connect the plug until it is fully seated.
Close the Battery Compartment
Replace the cover and tighten the screws—snug, not overly tight.
Part 6. What to do after installing the new battery
After installing the new battery:
- Fully charge the robot before first use
- Let it complete one full cleaning cycle
- Allow it to recharge completely afterward
Some models require battery calibration, which usually means running one or two full clean-and-charge cycles.
Part 7. Common mistakes to avoid
- Using a battery with incorrect voltage
- Buying ultra-cheap, uncertified batteries
- Skipping the first full charge
- Pulling battery wires instead of connectors
- Overtightening screws and damaging plastic threads
Avoiding these mistakes helps protect both the battery and the robot.
Part 8. Troubleshooting after battery replacement
If your robot doesn’t behave as expected after replacement, check the following:
| Problem | Possible Cause | Solution |
|---|---|---|
| Robot won’t turn on | Loose battery connector | Reopen cover and reseat connector |
| Runtime still short | Dirty filter or brushes | Clean or replace consumables |
| Charging error | Incompatible battery | Verify voltage and connector |
| Stops mid-clean | Calibration needed | Run full clean + recharge cycle |
Part 9. Battery care, storage, and safety tips
To extend battery lifespan:
- Avoid extreme heat and moisture
- Keep charging contacts clean
- Don’t store the robot for months at 0% or 100%
- For long-term storage, keep battery at 40–60% charge
Battery disposal:
Rechargeable batteries should be recycled at authorized collection points. Never throw them in household trash.
Part 10. Cost, replacement frequency, and is worth it?
Most robot vacuum replacement batteries cost $30–80, depending on brand and capacity.
Battery replacement is worth it if:
- The robot is under 5 years old
- Navigation, motors, and sensors still work well
- Replacement cost is under ~30% of a new robot
Consider buying a new robot if:
- Motors or navigation are failing
- Battery replacement doesn’t noticeably improve runtime
In many cases, a new battery can make your robot vacuum feel almost brand new.
Part 11. Conclusion
Replacing a robot vacuum battery is one of the easiest and most cost-effective ways to extend the life of your device. With the right battery, proper installation, and good charging habits, your robot vacuum can continue cleaning efficiently for years.
If your robot vacuum isn’t running like it used to, a battery replacement might be all it needs.
Part 12. FAQs
Can I use a higher-capacity battery?
Only if voltage, size, and connector match exactly. Higher capacity may improve runtime but can affect charging behavior.
Will a third-party battery void my warranty?
It depends on the manufacturer. Always check warranty terms.
Why is runtime still short after replacement?
Dirty filters, worn brushes, or aggressive cleaning modes can reduce runtime.
How long should the new battery last?
Most Li-ion robot vacuum batteries last 500–800 charge cycles with proper care.
Related Tags:

More Articles

고방전 배터리는 높은 전류와 발열로 배터리수명이 줄어듭니다. 구조적 한계, 사용 패턴, 충전 습관 등 실제 수명 단축 요인을 체계적으로 분석했습니다.
Capacitor vs Battery: What is the Difference?
Capacitor vs battery explained in detail. Learn the difference between capacitor and battery in energy storage, charging speed, lifespan, and real applications.
18650 Battery vs AA: Which Is Better for Your Device?
Compare 18650 vs AA batteries in capacity, voltage, rechargeability, and applications. Learn which battery type fits high-drain or everyday devices.
What is the Difference Between Battery Cell, Battery Control Module, and Battery Pack?
Compare battery cells, modules, and packs. Learn functions, design differences, control modules, and selection tips for EV, ESS, and industrial use.
How to Prevent LiPo Battery Explosion?
Can LiPo batteries explode or catch fire? Learn key causes of LiPo battery fires and proven charging, storage, and handling tips to reduce explosion risk.