- Key takeaways
- Part 1. How to hook up a camper battery: quick answer
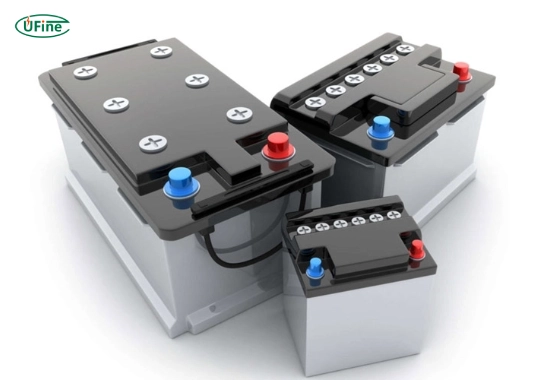
- Part 2. What is a camper battery?
- Part 3. Why is the RV battery connection important?
- Part 4. Before connecting an RV battery
- Part 5. Tools and materials needed for camper battery hookup
- Part 6. How to identify positive and negative camper battery cables
- Part 7. Step-by-step guide: how to hook up a camper battery
- Part 8. How to check the camper battery with a multimeter
- Part 9. RV battery hookup configurations
- Part 10. Travel trailer and tent trailer battery hookup
- Part 11. How to disconnect a camper battery
- Part 12. Common camper battery hookup mistakes
- Part 13. Why does my camper have no power after connecting the battery?
- Part 14. Why is there a spark when connecting an rv battery?
- Part 15. Can I hook up a solar panel to my camper battery?
- Part 16. How to maintain a camper battery after installation
- Part 17. Signs a camper battery may need replacement
- Part 18. FAQs about how to hook up a camper battery
Knowing how to hook up a camper battery is essential for safe and reliable RV power. The battery supplies 12V DC power to key systems when shore power is unavailable.
Whether installing, reconnecting, or replacing a battery, correct polarity is critical. Incorrect connections can blow fuses, damage equipment, or stop power flow.
This guide explains how to connect a camper battery step by step, along with cable identification, wiring setups, solar charging, and troubleshooting.
Key takeaways
- Turn off the camper, disconnect shore power, stop the generator, and isolate solar charging before working on the battery.
- Confirm polarity from the + and − terminal marks.
- Connect the positive cable first and the negative cable last; disconnect in reverse order.
- Most campers use a 12V system, but confirm the required voltage in the RV manual.
- After hookup, check voltage and test the 12V system before closing the battery compartment.
Part 1. How to hook up a camper battery: quick answer
To hook up a camper battery, turn off all loads and charging sources, then confirm cable polarity. Connect the camper’s positive cable to the battery’s positive (+) terminal, followed by the negative cable to the negative (−) terminal.
Tighten connections to the recommended torque, reinstall terminal covers, secure the battery, and test the 12V system.
Connection order: Positive first → Negative last
Disconnection order: Negative first → Positive last
Part 2. What is a camper battery?
A camper battery is typically a deep-cycle battery designed to deliver steady power over extended periods.
Unlike starting batteries, which provide short bursts of high current, camper batteries support continuous loads such as:
- Interior and exterior lights
- Water pumps
- Ventilation fans
- Refrigerator control systems
- Furnace control boards
- USB ports and 12V outlets
- Slide-out controls and powered accessories
- Inverters for selected AC appliances
For a deeper comparison of battery types and capacities, see our deep-cycle RV battery guide.
Common camper battery types
| Battery Type | Main Features | Maintenance | Important Connection Note |
|---|---|---|---|
| Flooded Lead-Acid | Affordable and widely available | Requires water level checks and ventilation | Install upright in a ventilated compartment |
| AGM | Sealed, vibration resistant | Low maintenance | Use a compatible charging profile |
| LiFePO4 | Lightweight, long cycle life | No routine maintenance | Ensure charger and low-temperature compatibility |
Before switching battery types, verify that the camper’s charger supports the new chemistry. For example, a lead-acid charger may not fully charge lithium batteries.
Part 3. Why is the RV battery connection important?
Proper RV battery connections ensure efficient current flow and reduce voltage loss and heat buildup.
Incorrect wiring can lead to:
- Blown reverse-polarity fuses
- Loss of 12V power
- Charging issues
- Damage to converters or appliances
- Overheating cables
- Sparks from loose connections
- Unexpected battery drain
Secure installation is equally important. A properly sized RV battery box protects against movement, moisture, and accidental contact.
Part 4. Before connecting an RV battery
1. Confirm the correct battery voltage
Most RV systems operate at 12V. Lead-acid batteries are labeled 12V, while LiFePO4 batteries are typically 12.8V.
Always verify voltage requirements using the RV manual or wiring diagram. Connecting a 24V system to a 12V camper can damage electrical components.
2. Check battery compatibility
Confirm key specifications before installation:
- Voltage
- Chemistry
- Capacity (Ah)
- Charge/discharge limits
- Size and terminal type
- Charger compatibility
For selection guidance, refer to our 12V deep-cycle battery guide.
3. Turn off every power source
Before working on the battery:
- Disconnect shore power
- Turn off the generator
- Switch off 12V loads
- Turn off the battery disconnect switch
- Disable solar charging
- Disconnect the tow vehicle if applicable
Even with lights off, systems like converters or solar controllers may still supply power.
4. Follow basic battery safety
Wear protective gear and remove metal jewelry. Keep sparks, flames, and metal tools away from terminals.
Handle flooded batteries in ventilated areas. For detailed safety standards, refer to OSHA battery guidelines and the NFPA safety overview.
Part 5. Tools and materials needed for camper battery hookup
Prepare these items:
- Compatible camper battery
- Insulated wrench or socket set
- Digital multimeter
- Safety glasses and gloves
- Terminal cleaning brush
- Clean cloth
- Terminal protectant (optional)
- Cable labels or tape
- Cable ties or supports
- Battery hold-down hardware
Use properly sized tools to avoid slipping and damaging terminals.
Part 6. How to identify positive and negative camper battery cables
Correct cable identification is critical for safe installation.
Positive battery connection
The positive terminal is marked +. The cable often:
- Uses red insulation
- Connects to a fuse or breaker
- Leads to the 12V distribution system
Negative battery connection
The negative terminal is marked −. The cable often:
- Uses black or white insulation
- Connects to the chassis ground
Important: Wire colors vary by RV. Always confirm polarity using terminal markings, wiring diagrams, or testing.
If wiring is unclear or modified, consult a qualified technician.
Part 7. Step-by-step guide: how to hook up a camper battery
Prepare the work area
Park on a stable surface and ensure the area is dry and ventilated.
Disconnect power sources
Unplug shore power, stop the generator, and isolate solar charging.
Inspect the battery
Do not install batteries with cracks, leaks, swelling, or damaged terminals.
Inspect cables
Check for corrosion or damage. Clean or replace as needed.
Secure the battery
Position and fasten the battery to prevent movement.
Confirm polarity
Verify terminal markings and cable routing before connecting.
Connect positive first
Attach the positive cable and tighten to the recommended torque.
Connect negative last
Attach the negative cable and secure it properly.
Order: Positive → Negative
Protect connections
Install covers and route cables safely. For detailed guidance, see tightening battery post connections safely.
Test the system
Restore power and confirm normal operation of lights, pumps, and control systems.
Part 8. How to check the camper battery with a multimeter
Use a multimeter to verify voltage:
- Set to DC voltage
- Connect red probe to positive
- Connect black probe to negative
- Read the voltage
Reversed probes will show a negative reading.
Typical resting voltage reference
| Battery Type | Typical Fully Charged Resting Voltage | Important Note |
|---|---|---|
| 12V Flooded Lead-Acid | About 12.6–12.8V | Measure after rest |
| 12V AGM | About 12.7–12.9V | Varies by manufacturer |
| 12.8V LiFePO4 | About 13.3–13.6V | Voltage alone is not precise SOC |
For charging details, see how to charge a 12V battery.
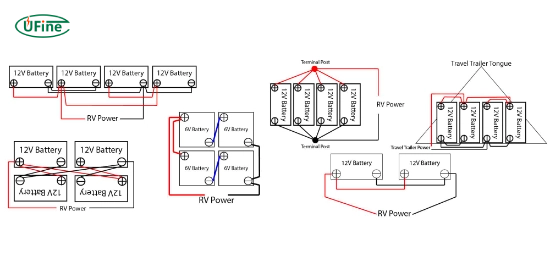
Part 9. RV battery hookup configurations
Battery setups may use single or multiple units. Choose the correct configuration:
| Battery Setup | Connection Method | Final Voltage | Capacity Result |
|---|---|---|---|
| One 12V battery | Direct connection | 12V | Same capacity |
| Two 12V parallel | Positive to positive, negative to negative | 12V | Higher capacity |
| Two 6V series | Positive to negative | 12V | Same capacity |
| Two 12V series | Positive to negative | 24V | Not for standard RVs |
Parallel connection (12V)
Connect positive-to-positive and negative-to-negative to increase capacity.
Series connection (6V)
Connect one battery’s positive to the other’s negative to create 12V.
For more details, see 6V batteries for RV systems.
Important: Do not connect two 12V batteries in series unless the system supports 24V.
Part 10. Travel trailer and tent trailer battery hookup
Follow standard polarity:
Positive → Positive
Negative → Negative
Additional wires may power accessories like tongue jacks or solar controllers. Identify each before disconnecting.
Part 11. How to disconnect a camper battery
Reverse the connection order:
- Turn off loads
- Disconnect power sources
- Disconnect negative first
- Disconnect positive second
Order: Negative → Positive
Part 12. Common camper battery hookup mistakes
- Reversing polarity
- Assuming wire colors
- Connecting negative first
- Leaving power sources active
- Ignoring corrosion
- Overtightening terminals
- Not securing the battery
- Mixing incompatible batteries
Part 13. Why does my camper have no power after connecting the battery?
Check common issues:
| Cause | Check |
|---|---|
| Disconnect switch OFF | Turn ON |
| Low battery | Measure voltage |
| Loose/corroded terminals | Inspect and clean |
| Blown fuse | Replace if needed |
Part 14. Why is there a spark when connecting an rv battery?
A small spark can be normal. It often happens when devices start up.
But a large or repeated spark is not normal. It may mean a problem.
Check these common causes:
- Appliances are still turned on
- Inverter is active
- Solar or charger is still connected
- Battery cables are reversed
- Loose or damaged wiring
If you see a strong spark, stop immediately. Turn off all power and check connections.
Part 15. Can I hook up a solar panel to my camper battery?
Yes, you can. But you must use a charge controller.
Correct setup:
Solar Panel → Charge Controller → Battery
Do not connect a solar panel directly to the battery.
Make sure the system matches:
- Battery voltage (12V, 24V, etc.)
- Battery type (AGM, lead-acid, lithium)
- Controller rating
Always follow the controller manual for safe connection order.
Part 16. How to maintain a camper battery after installation
Regular maintenance helps your battery last longer.
- Check the battery every month
- Keep terminals clean and dry
- Tighten loose connections
- Keep the battery fully charged
- Use the correct charger for your battery type
- Check water level (for flooded batteries only)
- Store in a cool, dry place when not in use
Part 17. Signs a camper battery may need replacement
Watch for these warning signs:
- Battery drains quickly
- Voltage drops fast under load
- Battery will not hold a charge
- Swelling or bulging case
- Cracks or leaks
- Corrosion that keeps coming back
If you see these signs, replace the battery as soon as possible.
Part 18. FAQs about how to hook up a camper battery
Which battery terminal should I connect first on a camper?
Connect positive (+) first, negative (−) last. Disconnect in reverse: negative first, positive second.
What color is the positive wire on a camper battery?
Usually red. Not universal. Confirm using terminal marks or wiring diagram.
What happens if an RV battery is connected backward?
Blows fuses and may damage wiring or devices. Disconnect immediately and inspect before reconnecting.
Can I use a car battery in my camper?
Not recommended. Use a deep-cycle battery for repeated discharge.
Can I connect multiple batteries to my RV?
Yes. Parallel for more capacity at 12V. Series (two 6V) for 12V. Ensure compatibility.
Related Tags:

More Articles

Is Battery Acid Dangerous? Safety Information and Risks
Is battery acid dangerous? Learn about battery acid burns, dried residue, poisoning symptoms, safe handling, spill cleanup, and first aid.
How Much Does a Tesla Battery Weigh?
Tesla batteries weigh about 1,000–1,600 lb (450–720 kg), depending on model and pack design. Compare Tesla battery weight, size, capacity, and impact.
Lithium Battery Not Charging and How to Solve it?
Lithium ion battery not charging? Learn why, follow safe step-by-step fixes, revive a sleeping battery, and know when replacement is the safer choice.
Battery Health Charging Should Be What Per cent for Maximum Lifespan?
For better battery health, keep lithium-ion batteries near 20–80% for daily use. Learn when to charge to 100%, avoid 0%, and set charging limits.
What Is the Best LiFePO4 Battery Charger? Complete Guide
Find the best LiFePO4 battery charger with this complete guide. Learn voltage, current, charging methods, and how to choose the right charger.