- Key takeaways
- Part 1. What is a lithium battery pack?
- Part 2. Essential tools and materials
- Part 3. Step-by-step lithium battery pack assembly
- Part 4. Common mistakes to avoid
- Part 5. DIY vs professional battery pack assembly
- Part 6. Is a DIY lithium battery safe?
- Part 7. Advanced tips for longevity and performance
- Part 8. Conclusion
- Part 9. FAQs
Building your own lithium battery pack can be an extremely rewarding experience, but it’s not something to take lightly. Lithium-ion cells are powerful and, if mishandled, can be dangerous. With the right guidance, professional tips, and attention to detail, you can safely create a battery pack that meets your energy needs. This guide dives deep into lithium battery assembly, from tools and materials to safety, testing.
Key takeaways
- DIY lithium battery packs require careful planning, matched cells, and proper assembly to ensure safety and longevity.
- Tools, materials, and step-by-step procedures are critical to avoid hazards and maximize performance.
- Knowing the differences between DIY and professionally assembled packs can help you make an informed decision.
- Ufine Battery provides custom lithium battery solutions, offering professional-grade reliability and certifications.
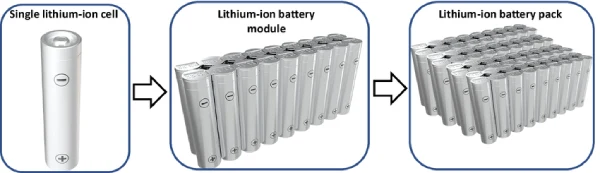
Part 1. What is a lithium battery pack?
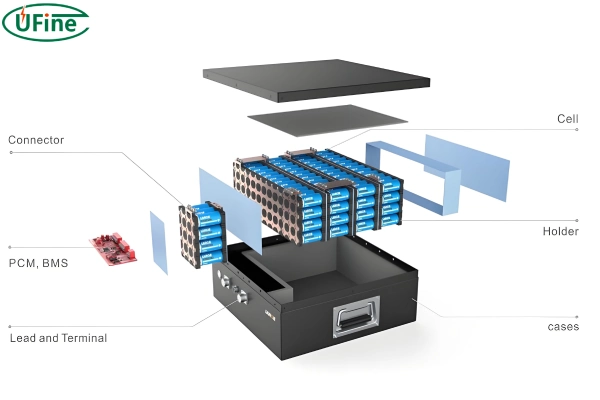
A lithium battery pack consists of multiple lithium-ion cells connected in series and/or parallel to achieve the desired voltage and capacity. Each individual cell contributes energy, but the configuration determines how the pack performs in real-world applications.
Unlike disposable batteries, lithium battery packs must be carefully assembled to prevent issues such as voltage imbalance, short circuits, or thermal runaway.
Understanding the science behind series and parallel connections is crucial. In series, the voltages add up while the capacity remains the same.
In parallel, capacity increases but voltage stays constant. This knowledge allows you to design a pack that precisely fits your device’s requirements.
To better understand how lithium batteries work in series and parallel, check out our overview of lithium batteries in parallel and series.
Part 2. Essential tools and materials
Success in battery assembly starts with having the right tools and materials:
- Lithium-ion cells: Choose high-quality, matched cells (e.g., 18650 or 21700) to ensure consistent performance.
- Battery Management System (BMS): Protects against overcharge, over-discharge, and short circuits, balancing the cells to prevent damage.
- Nickel strips or bus bars: For secure and low-resistance connections between cells.
- Spot welder or soldering iron: Spot welding is preferred to avoid heat damage to cells.
- Insulation materials: Heat shrink tubing, Kapton tape, or fish paper prevent shorts and improve durability.
- Multimeter and voltage tester: Verify cell voltage and detect anomalies before and after assembly.
Use only cells from reputable manufacturers and avoid mixing old and new cells. Even a slight voltage mismatch can reduce the lifespan of your entire pack.
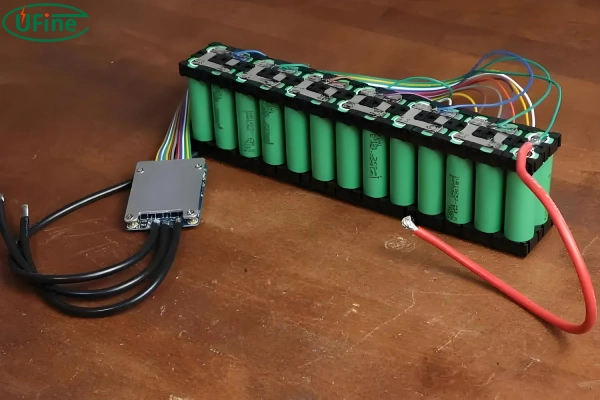
Part 3. Step-by-step lithium battery pack assembly
Select and Match Your Cells
High-quality cells are the foundation. Measure and match cells by voltage and capacity. Aim for a maximum voltage difference of 0.05V between cells. This ensures uniform charging and reduces stress during operation.
Plan Your Configuration
Choose the correct series (S) and parallel (P) arrangement based on your voltage and capacity needs. For example, a 4S3P pack combines 4 cells in series for voltage and 3 in parallel for capacity.
Configuration Table:
| Configuration | Voltage | Capacity |
|---|---|---|
| 3S1P | 11.1V | 2500mAh |
| 3S2P | 11.1V | 5000mAh |
| 4S3P | 14.8V | 7500mAh |
Planning your layout in advance and labeling cells will save significant time and prevent costly mistakes.
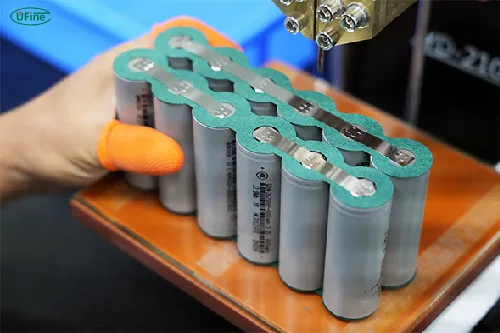
Connect Cells Securely
Use nickel strips and a spot welder to connect cells. Avoid soldering directly, which can damage cells due to excessive heat. Ensure each weld is uniform to minimize electrical resistance. Test each connection with a multimeter to confirm continuity.
Pro Tip: Keep the work area clean, free from metallic debris, and ensure cells are insulated during welding.
Install the BMS
A BMS balances the pack, protects against overcharge/discharge, and prevents thermal runaway. Connect each wire carefully according to the BMS diagram. Double-check polarities to avoid catastrophic failures. Some advanced BMS units also provide Bluetooth monitoring for real-time voltage, temperature, and cycle data.
Insulate, Test, and Encase
After assembly, use heat-shrink tubing or fish paper to insulate the pack. Test each cell with a multimeter, then perform a controlled discharge to verify performance. Only after all tests are passed should the pack be installed in its device enclosure.
Safety Reminder: Always wear protective equipment, keep a fire extinguisher nearby, and never charge the pack unattended during the first few cycles.
Safety Reminder: Always wear protective equipment, keep a fire extinguisher nearby, and never charge the pack unattended during the first few cycles.
Part 4. Common mistakes to avoid
- Mixing old and new cells or different brands.
- Skipping the BMS or using an incompatible BMS.
- Poor welding technique leading to high-resistance joints.
- Incorrect series/parallel configuration resulting in imbalance.
- Neglecting insulation leading to short circuits.
Awareness of these pitfalls significantly enhances both performance and safety.
Part 5. DIY vs professional battery pack assembly
While DIY packs can be educational and cost-effective, there are distinct differences from professionally manufactured packs:
| DIY | Professional (Ufine Battery) |
|---|---|
| Hands-on learning | Optimized for performance and safety |
| Cost-effective | Certified quality, engineered for longevity |
| Safety risks if not careful | Built to comply with industry safety standards |
| Limited lifecycle | Customizable, high-efficiency packs |
Ufine Battery offers custom solutions tailored to your voltage, capacity, and physical design needs. Our engineers ensure every pack meets stringent safety, performance, and reliability standards.
Part 6. Is a DIY lithium battery safe?
Even experienced hobbyists must treat lithium packs with respect. Key precautions include:
- Working in a well-ventilated area away from flammable materials.
- Wearing safety glasses and gloves.
- Never overcharge or discharge cells beyond recommended limits.
- Keep a small fire extinguisher nearby.
- Avoiding mechanical stress or puncture of cells.
Adhering to these rules ensures that your DIY experience is both educational and safe.
Learn more about 18650 battery short-circuit risks and safety tips to keep your DIY pack safe.
Part 7. Advanced tips for longevity and performance
- Cell Balancing: Regularly check voltages across parallel groups to maintain uniform performance.
- Temperature Management: Avoid charging or discharging at extreme temperatures; it prolongs lifespan.
- BMS Monitoring: Choose a BMS with protection for overcurrent, overvoltage, undervoltage, and temperature.
- Professional Consultation: Even if assembling yourself, consulting with experts, or using partially preassembled modules from companies like Ufine Battery can minimize risk.
Part 8. Conclusion
Creating a lithium battery pack blends science, precision, and careful craftsmanship. Selecting high-quality cells, planning your configuration, assembling with proper tools, and following stringent safety measures can yield a reliable and efficient pack.
However, if you seek professional-grade performance, consistent quality, and safety certification, partnering with a trusted manufacturer like Ufine Battery is a smart choice. Our custom solutions save time, reduce risk, and ensure your battery performs optimally for years.
With these insights, you can confidently decide whether to take the DIY route or invest in professional assembly, always prioritizing safety and performance.
Part 9. FAQs
How can I tell if my cells are properly matched?
Measure voltage, capacity, and internal resistance; cells should have minimal variance to ensure longevity.
What’s the difference between spot welding and soldering for battery assembly?
Spot welding avoids heat damage to cells, while soldering can overheat and degrade battery life.
Can a DIY lithium pack handle high-drain devices?
Only if cells and BMS are rated for high discharge; mismatched packs risk overheating or damage.
Is it worth using pre-matched battery modules instead of assembling cells yourself?
Yes, pre-matched modules save time, reduce error, and are safer, especially for beginners.
Related Tags:

More Articles

Do Lithium Ion Batteries Have Nickel?
Do lithium ion batteries contain nickel? Learn which battery types use nickel, why it matters for energy density, and when LFP is a better choice.
Lithium Iron Phosphate vs Lithium Cobalt Oxide: Which is Better for Your Needs?
Compare LiFePO4 vs LiCoO2 batteries. Learn differences in safety, lifespan, cost, and energy density for EVs, storage, and electronics.
How Thin Can a Lithium Battery Get? Slim Battery Guide
Explore how slim lithium batteries work, how thin they can be, and what to consider before choosing a thin lithium battery.
How to Care for LiPo Batteries (2026 Guide): Charging, Storage & Lifespan Optimization
Learn how to care for LiPo batteries with proven charging, storage, and temperature practices. Improve LiPo battery lifespan, safety, and performance.
Best Rechargeable Batteries 2026: Tested by Type & Real Use Cases
Compare the best rechargeable batteries by type, lifespan, and performance. Tested lithium and NiMH picks for real-world use cases.