- Part 1. Why solder lithium batteries together?
- Part 2. Understand the battery chemistry and structure
- Part 3. Spot welding vs. soldering: which is better?
- Part 4. Tools and materials you’ll need
- Part 5. Safety first: precautions before you start
- Part 6. Designing the Battery Configuration
- Part 7. Preparing the battery terminals
- Part 8. Step-by-step: soldering the batteries together
- Part 9. Insulate and reinforce the pack
- Part 10. Test before use
- Part 11. Add a battery management system (BMS)
- Part 12. Mistakes to avoid
- Part 13. Final thoughts
Soldering batteries, especially lithium-based ones like 18650 cells or pouch cells, is a task that combines precision, safety awareness, and a clear understanding of electrochemical principles. While it might appear straightforward, mistakes in this process can cause significant safety hazards—from degraded cell performance to potential fire and explosion risks.
This guide provides a deep dive into everything you need to know about correctly soldering multiple lithium batteries together, whether you’re building a custom battery pack for your e-bike, designing a backup power system, or prototyping an IoT device.
Part 1. Why solder lithium batteries together?
Soldering is one of the most accessible methods for connecting lithium batteries in a pack—especially for DIY applications. While spot welding is safer and recommended for large-scale battery manufacturing due to minimal heat exposure, soldering remains popular among hobbyists and small-scale developers because:
- It requires less specialized equipment.
- It offers greater flexibility in prototyping and custom configurations.
- It’s suitable for low-volume assembly or repairs.
However, when improperly executed, soldering lithium batteries can compromise safety and reduce battery life due to thermal damage, cold joints, or poor electrical conductivity.
Part 2. Understand the battery chemistry and structure
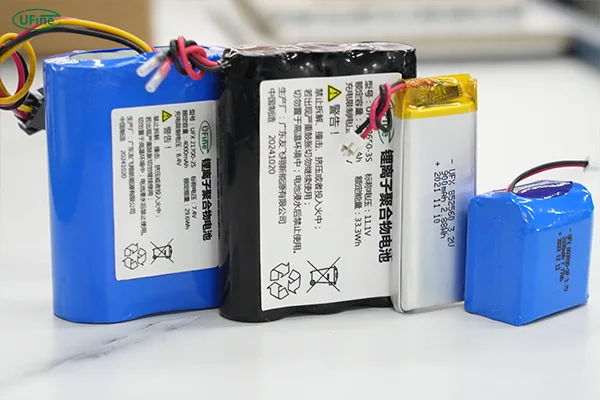
Before starting, it’s essential to understand the internal structure and thermal limitations of lithium batteries. The most commonly soldered types include:
- 18650 Cylindrical Cells: Typically Li-ion (Lithium Cobalt Oxide or NMC) with a nominal voltage of 3.7V. These are widely used in power tools, laptops, and EVs.
- LiPo (Lithium Polymer) Pouch Cells: Lightweight, thin, and high-output, commonly found in drones and RC devices. They are more thermally sensitive.
- LiFePO4 Cells: Known for their thermal stability, safety, and long lifespan. Nominal voltage is 3.2V per cell.
Key Note:
Lithium cells have low thermal tolerance. Internal temperatures above 60°C (140°F) can lead to electrolyte degradation, gas expansion, swelling, or catastrophic failure. That’s why the soldering process must be fast and efficient, minimizing heat transfer to the cell body.
Part 3. Spot welding vs. soldering: which is better?
Spot welding is the gold standard in battery pack assembly for a reason. It creates solid electrical connections without transferring much heat to the cell body. However, it requires a pulse welder and nickel strip management, making it cost-prohibitive for many users.
Soldering, on the other hand, is more accessible, but it introduces heat risk. With proper technique—quick, low-heat, clean joints—it can still be a viable method for safe, long-lasting connections.
If you’re handling high-volume or commercial-grade packs, consider outsourcing your battery assembly to experienced manufacturers like Ufine Battery, which offers custom lithium battery packs with advanced spot welding, integrated BMS, and protection circuitry.
Part 4. Tools and materials you’ll need
Essential Equipment:
- Soldering Iron: 60–80W with a chisel or wedge tip. Temperature-controlled station preferred (keep around 300°C to 350°C).
- Solder Wire: 60/40 tin-lead for lower melting point and strong joints. Lead-free is environmentally safer but requires more heat.
- Flux Paste or Liquid: Enhances solder flow and joint quality.
- Nickel Strips or Copper Braided Wire: Nickel has high corrosion resistance and is ideal for battery tabs.
- Kapton Tape or Fish Paper: For insulation and heat protection.
- Multimeter: To check voltage, polarity, and continuity.
- Heat-Resistant Gloves and Safety Goggles: Protection from hot solder and potential outgassing.
Optional:
- Thermal clamps or heat sinks to reduce heat flow into the battery.
- IR thermometer or thermal camera to monitor battery surface temperature during soldering.
Part 5. Safety first: precautions before you start
Soldering lithium batteries comes with real danger if handled improperly. Follow these precautions:
- Discharge batteries to a safe level (~3.6V) before soldering. Full batteries are more prone to thermal runaway.
- Work on a non-conductive and fireproof surface.
- NEVER solder swollen, damaged, or recycled cells unless you’re experienced and equipped for it.
- Avoid inhaling fumes—use a fume extractor or work in a well-ventilated area.
- Keep a Class D fire extinguisher or bucket of sand within arm’s reach.
Part 6. Designing the Battery Configuration
Before connecting cells, you must define the electrical layout:
- Series Connection (S): Increases voltage. e.g., 3 × 3.7V cells = 11.1V.
- Parallel Connection (P): Increases current/capacity. e.g., 3 × 2,500mAh = 7,500mAh at 3.7V.
- Series-Parallel (S-P): Combines both for customized packs.
Complete Overview Lithium Batteries in Parallel and Series
Planning Tips:
- Sketch your configuration before starting.
- Label each battery’s polarity (+/-) clearly.
- Group cells with similar voltage and internal resistance for better balance and performance.
Ufine Battery engineers recommend using matched, factory-balanced cells in high-current applications to minimize imbalance and heat during operation.
Part 7. Preparing the battery terminals
Before soldering:
- Clean the terminals with 99% isopropyl alcohol to remove dirt and oxide.
- Lightly roughen the surface using fine-grit sandpaper (1000–1500 grit) to improve solder adhesion.
- Apply flux paste to both the battery terminal and the nickel strip.
Then:
- Pre-tin the battery terminal: Heat it for 1–2 seconds and apply a small amount of solder.
- Pre-tin the nickel strip: Apply solder to the contact area.
This step reduces total heat time when you make the final connection and improves bond strength.
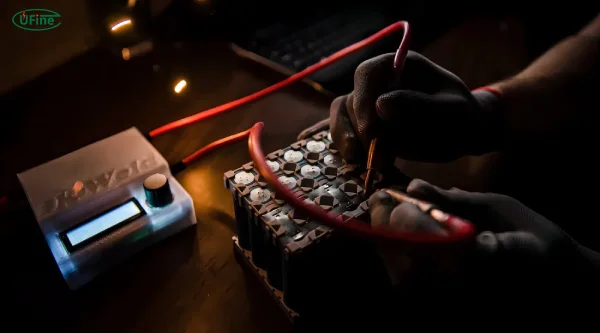
Part 8. Step-by-step: soldering the batteries together
A. Set Up:
- Clamp or hold the battery securely to avoid slipping.
- Use non-conductive tools or holders.
- Pre-position your nickel strip or copper braid.
B. Execution:
- Align the tinned strip with the tinned terminal.
- Heat the joint quickly with your soldering iron (2–3 seconds max).
- Remove the heat and let the joint cool.
- Inspect the joint for completeness and strength (a shiny, domed surface is ideal).
C. Repeat:
Continue for all series and parallel junctions. Keep track of polarity at each step.
Important: Let the battery rest between solders to avoid heat buildup. Monitor the temperature if possible; surface temps should not exceed 60°C.
Part 9. Insulate and reinforce the pack
Once soldering is complete:
- Use Kapton tape to insulate each solder joint.
- Cover exposed nickel strips with fish paper to avoid shorts.
- Add foam spacers or 3D-printed holders to absorb mechanical stress.
- Finish with PVC heat shrink tubing or flame-retardant wrap.
Mechanical rigidity is essential. Loose cells can cause fatigue failures in solder joints or internal damage to the battery structure.
Part 10. Test before use
Using your multimeter:
- Measure individual cell voltages to confirm balance.
- Measure overall pack voltage to confirm configuration.
- Check continuity across soldered joints.
- Verify correct polarity at the output terminals.
If your pack uses a BMS, ensure the balance leads are connected properly.
A thermal camera is useful to check if any joints are generating excess heat after assembly.
Part 11. Add a battery management system (BMS)
A BMS is critical in any lithium pack beyond two cells. It manages:
- Overcharge protection
- Over-discharge protection
- Cell balancing
- Short-circuit protection
Connect the BMS after soldering is complete:
- Wire the balance leads to the correct cell junctions.
- Connect the charge/discharge leads based on your configuration.
- Secure the BMS with insulation and thermal separation from the cells.
If you’re unsure about BMS sizing or integration, Ufine Battery offers turnkey custom packs with matched cells, BMS, and thermal protection—all tested to industrial standards.
Part 12. Mistakes to avoid
Here are some of the most common (and dangerous) mistakes:
- Holding the iron too long: Overheats the cell and may cause internal shorting.
- Using thick wires instead of nickel strips: Leads to poor connections and overheating.
- Skipping flux or pre-tinning: Results in cold joints with high resistance.
- Not checking polarity: Reversed connections can destroy your circuit.
- No insulation between terminals: Leads to accidental shorts and fire hazards.
Part 13. Final thoughts
While soldering lithium batteries is a practical option for low-volume or DIY projects, it’s a process that requires respect for both the chemistry and the physics involved. With proper tools, preparation, and safety precautions, you can create reliable and efficient battery packs that perform well and last long.
For larger projects, custom pack development, or industry-certified battery assemblies, Ufine Battery is a trusted solution provider. With over a decade of experience, Ufine delivers custom lithium battery packs, advanced BMS integration, and full compliance with safety and quality standards like UL, CE, and UN38.3.
Contact Ufine Battery today for professional assistance with your lithium battery projects.
Related Tags:

More Articles

Big Square Battery Safety Standards You Must Know
Learn key safety standards for big square batteries to avoid fire risks, shipping delays, and compliance issues in EV, industrial, and energy storage projects.
Big Square Battery Applications in Solar & Industrial Equipment
Big square batteries deliver high capacity, stable output, and long life for solar, industrial, and backup power. Explore key uses and advantages.
Big Square Battery vs Cylindrical Battery: Complete 2025 Guide for EVs, ESS & Industrial Devices
Choosing the right battery is key for designers and engineers. Compare big square vs cylindrical batteries to find the best fit for your application.
How to Choose the Right Big Square Battery for Your Device?
If you’re choosing a big square battery for EVs, solar, or mobility devices, this guide helps you pick the right solution for real-world needs.
Big Square Battery Complete Guide: Types, Uses & Buying Tips
If you are choosing a big square lithium battery for EVs, solar, RVs, or AGVs, this guide helps you select the right NMC, LFP, or LTO solution with examples.